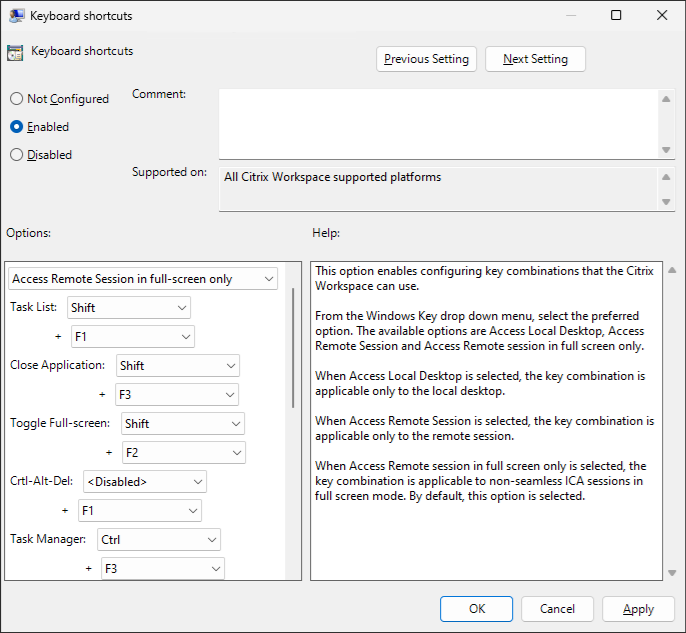
Citrix Workspace app for Windows passes most keys combinations through to the virtual app or desktop. However, by default it uses certain keyboard shortcuts to provide special functionality. These keyboard shortcuts apply to apps and desktops where the desktop viewer toolbar is disabled.
Important:
These shortcuts do not apply if the desktop viewer is enabled, instead see Keyboard shortcuts for desktop viewer.
| Number | Default shortcut | Function | Applies to |
|---|---|---|---|
| 1 | Shift+F1 | Invoke the Windows key locally to bring up the start menu | Apps and desktops |
| 2 | Shift+F3 | Close Citrix session window | Apps and desktops |
| 3 | Shift+F2 | For apps, toggle between seamless and windowed mode. For desktop toggle between full-screen and windowed mode. | Apps and desktops |
| 4 | Ctrl+F1 | Invoke Ctrl+Alt+Delete | Apps and desktops |
| 5 | Ctrl+F3 | Open task manager | Apps and desktops |
| 6 | Alt+F8 | Invoke Alt+Tab (task switcher). | Desktops |
| 7 | Alt+F9 | Invoke Shift+Alt+Tab (reverse task switcher). | Desktops |
| 8 | Ctrl+F2 | Invoke Ctrl+Esc (in desktops opens start menu). | Apps and desktops |
| 9 | Alt+F2 | Invoke Alt+Esc (switch windows). | Apps and desktops |
| 10 | n/a | Previously Ctrl+F5 enabled Latency Reduction. No longer applies. | |
| 11 | n/a | Reserved | |
| 12 | n/a | Reserved | |
| 13 | Shift+F11 | Minimizes the session window. | Desktops |
| 14 | Shift+F4 | Toggle IME mode. Only relevant when IME is configured. | Desktops |
| 15 | Ctrl+F12 | Relative Mouse. | Apps and Desktops |
You might find that these shortcuts clash with shortcuts used by your virtual apps. If this happens then you can either assign a different shortcut or disable the shortcut. To configure shortcut keys using Group Policy:
Alternatively you can configure keyboard shortcuts in StoreFront by editing the Default.ica. See Configure session settings. In the [WFCLIENT] section, for each hotkey add two entries:
| Key | Value |
|---|---|
| HotkeyChar | F1/F2/F3/F4/F5/F6/F7/F8/F9/F10/F11/F12/minus/plus/star/tab |
| HotkeyShift | Ctrl/Shift/Alt |
For example to configure shortcut 2, which is close Citrix session window, to use Alt+F3 instead of Shift+F3, add:
Hotkey2Char=F3 Hotkey2Shift=Alt
To disable shortcut 2, so the default shortcut Shift+F3 is passed through to the VDA, without an alternative shortcut:
Hotkey2Char= Hotkey2Shift=
Normally Citrix Workspace app passes all keys through to the virtual app or desktop. However, by default certain keyboard shortcuts that provide special functionality. These shortcuts apply only when using the Desktop Viewer. If you have disabled the desktop viewer then see Keyboard shortcuts.
| Default shortcut | Function |
|---|---|
| Ctrl+Alt+F1 | Toggle between full-screen and window |
| Ctrl+Alt+Break | Open the context menu of the desktop session |
You can customize (but not remove) the shortcut for the fullscreen toggle by using Group Policy. It is not possible to customize the shortcut for opening the context menu.

Note:
You can hide all or part of the Advanced Preferences sheet available from the Citrix Workspace app icon in the notification area. For more information, see Advanced Preferences sheet.
Keyboard layout synchronization enables you to switch among preferred keyboard layouts on the client device. This feature is disabled by default. The keyboard layout synchronization allows the client keyboard layout to automatically synchronize to the virtual apps and desktops session.
To configure keyboard layout synchronization using the GPO administrative template:
Note:
The GPO configuration takes precedence over the StoreFront and the GUI configurations.
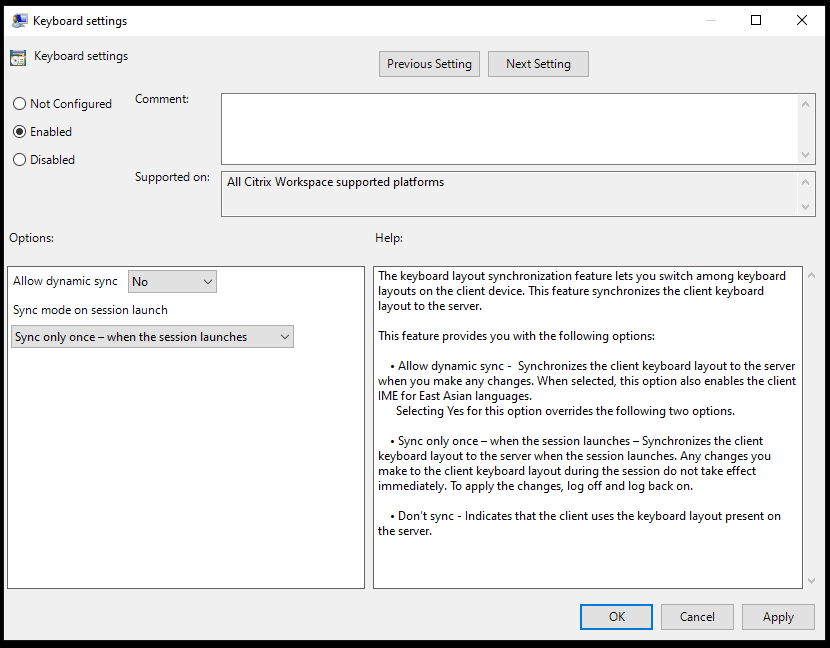
To configure keyboard layout synchronization using the graphical user interface:

To configure keyboard layout synchronization using CLI:
Run the following command from the Citrix Workspace app for Windows installation folder.
Typically, the Citrix Workspace app installation folder is at C:\Program files (x86)\Citrix\ICA Client .
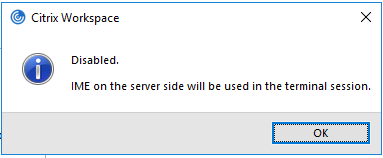
Using the client keyboard layout option activates the Client IME (Input Method Editor). If users working in Japanese, Chinese, or Korean prefer to use the Server IME, they must disable the client keyboard layout option by selecting No, or running wfica32:exe /localime:off . The session reverts to the keyboard layout provided by the remote server when they connect to the next session.
Sometimes, switching the client keyboard layout does not take effect in an active session. To resolve this issue, log off from Citrix Workspace app and login again.
Previously, it was possible to configure keyboard layout synchronization using the GUI or by updating the configuration file only. With the Citrix Workspace app 2309 version, the following commands are introduced to configure keyboard layout synchronization using the command-line-interface:
| Commands | Description |
|---|---|
| wfica32.exe /kbdsyncmode:once | Sets keyboard sync mode to “Sync only once”. |
| wfica32.exe /kbdsyncmode:dynamic | Sets keyboard sync mode to “Dynamic sync”. |
| wfica32.exe /kbdsyncmode:no | Sets keyboard sync mode to “Don’t sync”. |
Run the preceding commands from the Citrix Workspace app for Windows installation folder.
Typically, Citrix Workspace app installation folder is at C:\Program files (x86)\Citrix\ICA Client.
Note:
The following procedure applies only on Windows server 2016 and later. On Windows Server 2012 R2 and earlier, the keyboard sync feature is enabled by default.

After you enable the keyboard layout on both the VDA and Citrix Workspace app, the following window appears when you switch keyboard layouts.
This window indicates that the session keyboard layout is being switched to the client keyboard layout.
Launch the command prompt and run the following command:
/opt/Citrix/VDA/bin/ctxreg update -k "HKEY_LOCAL_MACHINE\System\CurrentControlSet\Control\Citrix\LanguageBar" -v "SyncKeyboardLayout" -d "0x00000001"
Restart the VDA for the changes to take effect.
For more information about the keyboard layout synchronization feature on Linux VDA, see Dynamic keyboard layout synchronization.
Hide the keyboard layout switch notification dialog:
The keyboard layout change notification dialog lets you know that the VDA session is switching the keyboard layout. The keyboard layout switch needs approximately two seconds to switch. When you hide the notification dialog, wait for some time before you start typing to avoid incorrect character input.
Warning
Editing the registry incorrectly can cause serious problems that might require you to reinstall your operating system. Citrix can’t guarantee that problems resulting from the incorrect use of the Registry Editor can be solved. Use the Registry Editor at your own risk. Be sure to back up the registry before you edit it.
Hide the keyboard layout switch notification dialog using the Registry editor:
Limitations:
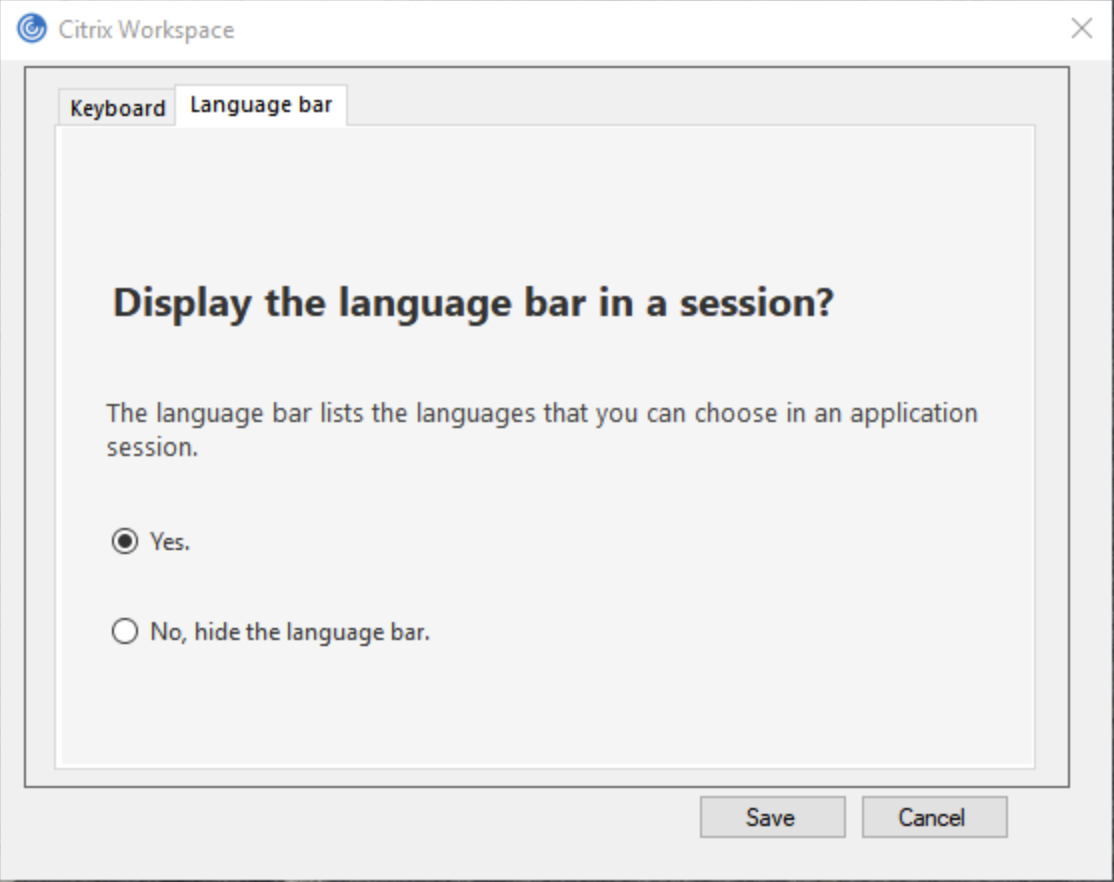
The language bar displays the preferred input language in a session. The language bar appears in a session by default.
Note:
This feature is available in sessions running on VDA 7.17 and later.
Configure the language bar using the GPO administrative template:
The language bar displays the preferred input language in an application session.
Configure language bar using the graphical user interface:
Hide the language bar tab from the Advanced Preferences sheet:
You can hide the language bar tab from the Advanced Preferences sheet by using the registry.
Note:
If you’re using a Windows 10 Version 2004 operating system, you might face certain technical issues when using the IME feature in a session. Those issues are the result of a third-party limitation. For more information, see the Microsoft Support article.
Configuring generic client IME using the command-line interface:

Note:
You can use the command-line switch wfica32.exe /localime:on to enable both generic client IME and keyboard layout synchronization.
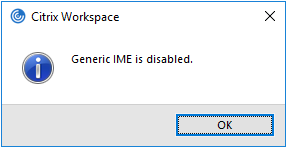
If you have disabled generic client IME using the command-line interface, you can enable the feature again by running the wfica32.exe /localgenericime:on command.

Toggle:
Citrix Workspace app supports toggle functionality for this feature. You can run the wfica32.exe /localgenericime:on command to enable or disable the feature. However, the keyboard layout synchronization settings take precedence over the toggle switch. If the layout synchronization setting is set as Off, toggling does not enable generic client IME.
Configure generic client IME using the graphical user interface:
Generic client IME requires VDA Version 7.13 or later.
The Generic client IME feature can be enabled by enabling keyboard layout synchronization. For more information, see Keyboard layout synchronization.
Citrix Workspace app allows you to configure different options to use generic client IME. You can select from one these options based on your requirements and usage.
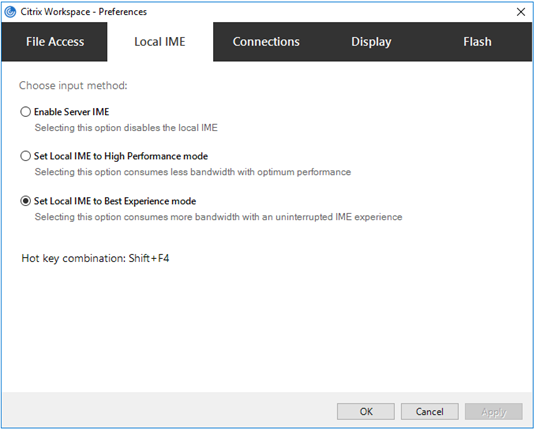
The following options are available to support different IME modes:
The changes are applied only for the current session.
Enabling hotkey configuration using a registry editor:
When generic client IME is enabled, you can use the Shift+F4 hotkeys to select different IME modes. The different options for IME modes appear in the top-right corner of the session.
By default, the hotkey for generic client IME is disabled.
In the registry editor, navigate to HKEY_CURRENT_USER\SOFTWARE\Citrix\ICA Client\Engine\Lockdown Profiles\All Regions\Lockdown\Client Engine\Hot Key .
Select AllowHotKey and change the default value to 1.
You can use the Shift+F4 hotkeys to select different IME modes in a session.
The different options for IME modes appear in the top-right corner of the session while switching using these hotkey combinations.

Limitations:
Previously, only the active keyboard on the client was synchronized with VDA after the session started in full-screen mode. In this scenario, if you configured Sync only once - when session launches on your Citrix Workspace app, and you had to change to a different keyboard, you have to manually install the keyboard on your remote desktop. Similarly, if you configured Allow dynamic sync on your Citrix Workspace app, you have to move to windowed mode, change the keyboard on your client, and then move back to full-screen mode.
Starting with the 2311.1 release, all available keyboards on the client are synchronized with VDA after the session starts in full-screen mode. You can select the required keyboard from the list of installed or available keyboards on the client after the session starts in full-screen mode.
The Synchronize multiple keyboards at session start feature is enabled by default on VDA, and disabled by default on the Citrix Workspace app.
On Citrix Workspace app for Windows:
Enable Sync only once - when the session launches keyboard layout setting. For more information, see Keyboard layout documentation.
On VDA:
Enable the following VDA policies:
Citrix Workspace app configuration:
This feature is applicable only on virtual desktops. This feature is disabled by default. To enable this feature, do the following:
VDA configuration:
The feature Synchronize multiple keyboards at session start is enabled by default on VDA. To disable this feature, update the VDA registry as follows:
The official version of this content is in English. Some of the Cloud Software Group documentation content is machine translated for your convenience only. Cloud Software Group has no control over machine-translated content, which may contain errors, inaccuracies or unsuitable language. No warranty of any kind, either expressed or implied, is made as to the accuracy, reliability, suitability, or correctness of any translations made from the English original into any other language, or that your Cloud Software Group product or service conforms to any machine translated content, and any warranty provided under the applicable end user license agreement or terms of service, or any other agreement with Cloud Software Group, that the product or service conforms with any documentation shall not apply to the extent that such documentation has been machine translated. Cloud Software Group will not be held responsible for any damage or issues that may arise from using machine-translated content.
DIESER DIENST KANN ÜBERSETZUNGEN ENTHALTEN, DIE VON GOOGLE BEREITGESTELLT WERDEN. GOOGLE LEHNT JEDE AUSDRÜCKLICHE ODER STILLSCHWEIGENDE GEWÄHRLEISTUNG IN BEZUG AUF DIE ÜBERSETZUNGEN AB, EINSCHLIESSLICH JEGLICHER GEWÄHRLEISTUNG DER GENAUIGKEIT, ZUVERLÄSSIGKEIT UND JEGLICHER STILLSCHWEIGENDEN GEWÄHRLEISTUNG DER MARKTGÄNGIGKEIT, DER EIGNUNG FÜR EINEN BESTIMMTEN ZWECK UND DER NICHTVERLETZUNG VON RECHTEN DRITTER.
CE SERVICE PEUT CONTENIR DES TRADUCTIONS FOURNIES PAR GOOGLE. GOOGLE EXCLUT TOUTE GARANTIE RELATIVE AUX TRADUCTIONS, EXPRESSE OU IMPLICITE, Y COMPRIS TOUTE GARANTIE D'EXACTITUDE, DE FIABILITÉ ET TOUTE GARANTIE IMPLICITE DE QUALITÉ MARCHANDE, D'ADÉQUATION À UN USAGE PARTICULIER ET D'ABSENCE DE CONTREFAÇON.
ESTE SERVICIO PUEDE CONTENER TRADUCCIONES CON TECNOLOGÍA DE GOOGLE. GOOGLE RENUNCIA A TODAS LAS GARANTÍAS RELACIONADAS CON LAS TRADUCCIONES, TANTO IMPLÍCITAS COMO EXPLÍCITAS, INCLUIDAS LAS GARANTÍAS DE EXACTITUD, FIABILIDAD Y OTRAS GARANTÍAS IMPLÍCITAS DE COMERCIABILIDAD, IDONEIDAD PARA UN FIN EN PARTICULAR Y AUSENCIA DE INFRACCIÓN DE DERECHOS.
本服务可能包含由 Google 提供技术支持的翻译。Google 对这些翻译内容不做任何明示或暗示的保证,包括对准确性、可靠性的任何保证以及对适销性、特定用途的适用性和非侵权性的任何暗示保证。このサービスには、Google が提供する翻訳が含まれている可能性があります。Google は翻訳について、明示的か黙示的かを問わず、精度と信頼性に関するあらゆる保証、および商品性、特定目的への適合性、第三者の権利を侵害しないことに関するあらゆる黙示的保証を含め、一切保証しません。
ESTE SERVIÇO PODE CONTER TRADUÇÕES FORNECIDAS PELO GOOGLE. O GOOGLE SE EXIME DE TODAS AS GARANTIAS RELACIONADAS COM AS TRADUÇÕES, EXPRESSAS OU IMPLÍCITAS, INCLUINDO QUALQUER GARANTIA DE PRECISÃO, CONFIABILIDADE E QUALQUER GARANTIA IMPLÍCITA DE COMERCIALIZAÇÃO, ADEQUAÇÃO A UM PROPÓSITO ESPECÍFICO E NÃO INFRAÇÃO.